Sunday, June 30, 2013

Follow My Blog With Bloglovin

I am not sure what the issue is with Google Reader and our blog lists but I have taken Karen's advice from Sew Many Ways and claimed my blog and imported my blog list over at Bloglovin.  Karen gives excellent instructions on how to do this on this POST.   So please:    Follow my blog with Bloglovin


Thursday, June 27, 2013

Sweet Sundresses for Sweet Little Girls

Just click on the photos to enlarge them!
 Sundress.  I even love the word.  It conjures up visions of sweet little girls running barefoot in the grass, dipping their toes in the ocean after watching the sun set at the beach, and tea parties in big hats beneath the shade of old oak trees.  Even big girls (like me) feel extra feminine wearing a flowing sundress with pretty sandals.  I just love sundresses!  If you follow this blog, you will have noticed just how many sundresses I make!  Fortunately, I live in St. Petersburg, Florida where wearing sundresses is appropriate seven months of the year (if not more!).
 Both these dresses are size twos and made from my 'go to' pattern Annie's Sundress and Jumper by Primrose Lane.  I used Tuti-Fruiti polycotton plisse' from JoAnn Fabric and Crafts.  This fabric washes and dries so well and needs no ironing, making it very friendly for busy mommies whose little girls like to wear the dresses over and over.  Both dresses were gifts for the daughters of friends, one for a birthday and one 'just because'.

Giving a gift 'just because' is such a joyful thing!

"I am a center of peace and joy.  God within me is the ultimate song that plays through my heart and life.  As I still my mind in prayer, I hear the song of the Divine and allow its melody to fill my being."  Daily Word, March 31, 2012

Clap your hands, all you peoples; shout to God with loud songs of joy.  Psalm 47:1

Saturday, June 22, 2013

Honeycomb Smocking for Lost Arts of Sewing


Today I am going to share the post I did for Jenn's Lost Arts of Smocking last month.  Please let me know if you found this tutorial helpful and if you try honeycomb smocking.  I'd love to see your work!


Hi!  I'm Karen from Butterflies and Faeries.  I am so honored to have been asked to guest blog for Jenn for this wonderful sewing series:  Lost Arts of Sewing.  I love to smock and embroider and find all handwork quite relaxing.  I wanted to combine my two favorite forms of handwork for this project but didn't want anyone who didn't have a pleater to feel that they couldn't duplicate the smocking. Sooo... I chose to do the oldest form of smocking using dots drawn on the right side of the fabric:  Honeycomb Smocking.
Honeycomb smocking on a vintage pillowcase dress I made earlier this year.
Honeycomb smocking is a wave stitch worked over dots evenly spaced on the surface of the fabric so that satin stitched dots appear on the front.  These dots control the resulting pleats which brings in the fullness of the fabric.  This form of smocking is sometimes referred to as seed smocking in old books because the dots resemble little colorful seeds.  
I looked over the sundress and pinafore patterns that I have and decided to combine two of them:  Madora's Sundress by Beaucoup for the bodice and 4-Way Baby Dress by Tie Dye Diva for the skirt section.  The following drawing is my sketch of the outfit.  I didn't get the hat made but that can be done at another time.
The finished dress and bloomer set is modeled by my friend Kaye's little girl Chloe.  I made the outfit in a size 18-24 months and Chloe is two and a half years old.  It was made for my grandmother's hope chest and I am anticipating my daughter to have chubbier children than Chloe so the outfit is large on her (but still adorable on the beautiful Miss Chloe!).
The first steps in honeycomb smocking are to chose fabric that you can see through over a light board or window and paper with dots 1/4 to 1/2 inch apart.  I used the dotted paper below.  It has the dots spaced approximately 1/2 inch apart.
The next sheet has dots drawn on smocking graph paper that has the dots spaced approximately 3/8' (1 cm) apart.
The next step is to determine how much fabric you will need for your chosen project.  I wanted the smocking to go from seam to seam just under the front bodice.  This type of smocking needs a ratio of 2:1.  (Example:  if you want 6 inches of smocking width  then you will need 12 inches of fabric width plus seam allowances.)
The following picture collage has the paper on the light board, then with the fabric taped over the board showing the first row of dots below the seam allowance and the washable pen, marking the dots with the blue washable pen, and inserting the threaded needle just to the right of the first dot on the far right of the fabric.  (Honeycomb smocking is smocked from right to left unlike regular geometric smocking which is from left to right.)  PLEASE CLICK ON THE PHOTOS TO ENLARGE THE PICTURES TO SEE THE STITCHES, ETC. MORE CLEARLY.
 I used a #7 darner needle and DMC stranded cotton thread (embroidery floss).  It comes in lengths of six strands combined.  You will need to separate the floss to use 2 or 3 strands for your smocking.  Two strands gives a smaller seed/dot and a more delicate appearance.  I used 3 strands for my smocking on this project.

Step 1:  Taking the first stitch:  Begin by threading the needle with the three strands of floss and knotting the end of the thread.  Bring the needle up just to the right of the first dot on the first row to the right of the fabric.
Step 2:
Step 3:
Step 4:
Step 5:
Step 6:


I embroidered a little vintage sailboat scene using two strands of the DMC floss.  I love how the sailboat appears to be visible through a ship's porthole!   I used shadow work for the hull of the boat but the satin batiste was too opaque to show the stitch to advantage.  I also used these common stitches in the embroidery:  lazy daisy, stem stitch, outline stitch, and French knots.
Always iron hand embroidery from the back.  I spritzed this with water and then spray starch and let it sit for a few moments.  Then I placed a scrap piece of white batiste over the back of the embroidery to iron it over a velour towel.

The beautiful Miss Chloe did a wonderful job modeling for me on a beach on the Tampa Bay.  For a two and a half year old she was remarkably cheerful and biddable...just very fast and 'busy'.  I understand now why professional photographers say that for every good photo of a little one, they have 20 'out-takes'!


As you can see, the outfit was very comfortable to wear.
I did make some fancy bloomers to go beneath the open-backed pinafore dress.
I just love this next photo that Chloe's mommy took!
I hope that this post has inspired you to try honeycomb smocking.  It really is an easy way to get your feet wet with smocking!  Blessings, Karen


Thursday, June 20, 2013

Lovely Melanie's Dress of Blues

Just click on the photos to enlarge them.
 This past school year I had the pleasure of having Jacob M. in my kindergarten class.  He is a charming little boy with a sweet and easy going personality.  He gets along with everyone, both girls and boys alike.  Jacob's mommy volunteered an entire morning nearly every week of the school year and her help was so very appreciated!  I was lucky to work with this family a couple of years ago when their oldest child Melanie was in my class.  What a sweetheart!  I made Melanie a sundress as my 'thank you' for this family.  Melanie looks stunning in blue and that is the color she chose.  Her mommy chose the Annie's Sundress and Jumper by Primrose Lane that I have used so often.  She felt that Melanie would get to wear the dress longer with the tie shoulders.

I used four coordinating prints and a solid blue for the hem band and the lining.  The skirt was made with eight 11 inch wide panels that were serged together and top stitched.  I used a piece of bias binding in the raspberry color that accents three of the coordinating fabrics to separate the hem band from the body of the skirt.  The waist is drawn in by 4 inch wide lined sashes to make a pretty bow in the back.
 I cut a large floral motif from one of the fabrics and appliqued it to the bodice of the dress.  I then found three different raspberry colored buttons in my stash to accent the flowers.  I've made this dress pattern so many times but each time I try to do something a little different so that each girl's dress is unique.
Blessings for peace and happiness!

Monday, June 17, 2013

Timmy and Mary Sunsuits

Just click on the photos to enlarge them.
 I have had such fun making these little sunsuits!  Everything that was in the lineup to be worked on was 'put on the back burner' so that I could have fun with this darling pattern.  Lisa over at Mommy's Apron Strings has provided the sewing community with this little reproduction of a vintage pattern in sizes 6 months-3 years...  for FREE!   (You can read all about it on Lisa's blog HERE. )  For my first one, I made the pattern as directed in the instructions but added snap tape to the opening at the crotch instead of setting snaps.  I used a sweet little toile cotton with teddy bear scenes printed over the toile and lined it with a solid pink cotton.  I chose to make these sunsuits in size 2 because I know several little girls in this size and will let my friends choose which ones they want.


I really do love the simplicity of this pattern.  It is a perfect canvass for all kinds of embellishments.
 I decided to make a little sun bonnet to match the sunsuit.   I used another reproduction vintage pattern by Bonnie Blue Designs ("Amanda's Vintage Style Playsuit and Bonnet").  I liked the open back but changed it to be adjustable by putting in a casing for the ribbon.  I only had a short length of the pink grosgrain ribbon to use in the casing.  I'll replace it with a longer length as soon as I can get to JoAnn's.
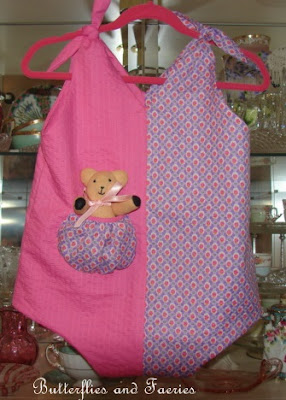
 This next sunsuit is also in a size 2 and I made some design changes with this one.  (I told you I was having fun!)  This time I color blocked the sunsuit and made a little penny pocket.


 Backside of pocket with the sides turned in and the bottom of the pocket slightly gathered to give it the puffiness.  The bias has been applied by machine to the gathered top of the pocket and it is now ready for the handwork on the back.
 Here it is from the front.
 And here is the little penny pocket hand sewn (little slip stitches all around) to the front of the sunsuit.
 So far, this one is my favorite but I have another one finished that my daughter adores.  She has asked that it be added to the stash in my grandmother's hope chest.  I'll show that one late next week.  I want to make a little hat for that one, too, and I won't be able to sew it until I come back from visiting my dear friend Jana in Georgia.  I have several posts scheduled to 'air' while I am gone.  I still have lots to share!
I have definitely enjoyed sewing these little suits!  Would you believe that there is a fourth one already cut out?!  FUN!

Friday, June 14, 2013

Twirly Skirt with Adjustable Waist (A Little Tutorial)

Please click on all photos to enlarge them.
 In my last post I mentioned adding buttonhole elastic to a skirt waistband with a flat front.  I used the Olabelhe Kirsten pattern.  (You can find it HERE.)  I found buttonhole elastic very difficult to purchase in my area so I made my own.  I used regular woven elastic but I think knit elastic would be easier to sew on for the buttonholes.  You could also make little tabs of your fabric and attach them to the ends of your elastic.  I sewed two buttonholes on each end of the back elastic.  I made them about an inch and a half apart.  This makes the skirt back adjustable to take in or let out up to three inches.
 This next photo shows the front and back waistband sewn together with the ties inserted in the seams, the facing edge finished by serging, and one of the two buttonholes marked.
 After making the buttonholes on each side of the back facing next to the seam, I folded the facing part of the waistband to the back, making sure that I left the proper seam allowance to sew the skirt to the band.  I then sewed a line of stitching under the bottom of the buttonhole for the elastic casing.
 In this next photo you will see the casing and that the skirt has been sewn to the waistband (keeping the facing free).  It is now pinned and ready to stitch down.  You can stitch in the ditch of the seam on the front so that no stitches show or you can offset your needle to topstitch and attach the facing at the same time.  (That is what I did on this skirt.)

 You can see the topstitching clearly in the next photo.
 I chose flat clear buttons to minimize irritation for the child wearing the skirt.  I also worried that the child would fiddle with the buttons and lose the elastic in the casing.  My solution:  I anchored the elastic down the center of the back casing and added ribbons with knots at the end so that it would be easy to pull the elastic out to refasten.
 I loved these fabrics and wanted to show you the hem band on the upper skirt and the ribbon covering the hem on the lower skirt.
 Ta-dah!  A pretty twirl skirt that will last a couple of years and can be passed along to others and easily adjusted to their measurements.

I didn't photograph each and every step because I was just going to use the photos to help me remember what I did to adapt this skirt.  Tutorials are usually much more detailed than this so I hope you found this little one useful!  Let me know if you try it.
Blessings for a wonderful day with lots of fun!
Related Posts with Thumbnails