Sunday, January 27, 2013

Love & Kisses for Project Run & Play Week 4 of Season 6


As always, just click on the photos to enlarge them.

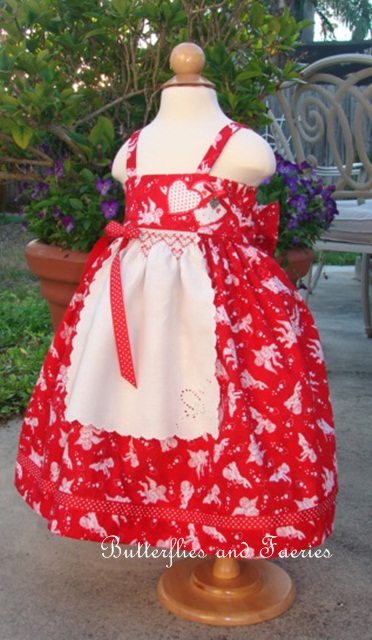
 I am having such fun with the sew-along challenges for Project Run and Play!  It is really motivating me to get some sewing accomplished.  This week's challenge is "Love is in the Air" for Valentines Day.  I decided to make a little dress that can be worn over a white knit shirt for beautiful little Chloe, the daughter of another kindergarten teacher at my school.  All materials, including the hand embroidered vintage linen napkin were in my stash.  I guess this counts as 'stash busting', too!

I used this McCalls pattern but made quite a few changes.  The pattern calls for shirring with elastic thread on the back bodice and doesn't have you line the bodices at all.  That doesn't work for me so I completely lined both the front and the back bodice pieces and made channels for elastic casings in the back piece.  I added at least 4 inches to the strap length and still feel they could be longer.  I also made the little loops in the back longer.  I added 5 inches to the sashes and lined them as well.  Next time I would make them even longer.  They seem very short to me.  Chloe is not quite 2 1/2 years old and I made a size 3 according to her measurements.  I feel that the pattern runs small and would size up next time.  This is a surprise because my experience with the Big Three pattern companies is that they usually run large.
As you can see, I basted a vintage napkin to the skirt front and put the entire front through my pleater making such nice little pleats for gathering it to the bodice.  I smocked the napkin section with red DMC floss in a simple heart design.  I appliqued two heart shapes in contrasting fabric and machine satin stitched around them in rayon thread.  The little pewter heart charm was in the jewelry findings box and was the perfect finishing touch.


You will see in the next picture that I didn't knot the straps after pulling them through the back loops the way the pattern shows the closure.  I didn't like how that looked so I tied them together.  The bow is big and pretty but I really would prefer the sashes to be longer.  We've been having some beautiful warm weather here lately.  If this weekend had been Valentines Day, Chloe could have worn this without a shirt!
This weekend was my son's 18th birthday.  I can't believe how fast these eighteen years have flown by!  Logan is a wonderful young man, an honor roll senior who makes us very proud of the good choices he makes every day.  That is my sweet husband in the picture with him.
I can't get over how much he looks like my Uncle Bill, my dad's younger brother.  He has his dad's upper lip and my eyes, though.  He has Uncle Bill's sense of humor and my dad's musical ear.  Logan plays the piano beautifully.
The last picture is of my daughter during the last week of December.  Victoria-Rose is 19 and is a freshman in college studying music performance and education.  She is a pianist and an opera singer.  I have two amazing children.  I am truly blessed.
Don't forget to stop by Project Run and Play to see all the other Valentine inspired outfits.  Next week is a challenge that I have been anxious to complete:  taking a man's shirt and making it into something for a child.  I am excited by this challenge and have been working on it off and on since the first week.  I have turned it into something for my "Grandmother's Hope Chest"!

Monday, January 21, 2013

Sailing, Sailing....Smocking for a Baby Boy: Project Run & Play, Week 3

As always, click on the photos to enlarge them for easier viewing.
 This is my entry for the sew-along challenge for PR&P Week #3:  Boys Week.  It is a birthday gift (late...gasp) for Liam's first birthday.  He is a beautiful little boy with dark brown eyes and brown hair and the most adorable little smile.  Liam is the first grandchild of dear neighbors of ours.  He lives in Miami where the temperature usually stays fairly warm (70's-90's) all year long so this little sunsuit will get plenty of wear.

I used the pattern "Baby Playsuit" by Creations By Michie' and a smocking plate by Pat Garretson Designs called "Bebe July".  I made a size one because Liam's measurements were just under the measurements for that size.  The insert and lining are Imperial broadcloth and the seersucker is a mystery.  It has been in my stash 'mellowing' for quite a while!  I believe I bought it when my own son was about three and I made a pair of shorts for him.  Logan will be 18 this week so I think it needed to be used!  It is a polycotton.  It will be very easy care for Liam's mama.

 
 I added two extra rows of waves to fill the rows required by the pattern for the insert and I like the way it came out.  I bordered the insert with red micro-check mini piping and used Wash Away Wonder Tape for the first time to hold the piping in place instead of pins.  Carol (Mama CJT of http://mamacjt.blogspot.com/), has been talking to me about this product and sent me some and I just love it!  Thank you Carol!  I will never do an insert without it again!  Carol also gave me the playsuit pattern (among lots of other heirloom sewing goodies).  You have to know that I thought of you all week long, Carol!

I love the open sides of the bodice.  It is so nice and cool for a south Florida baby!
I put the waistband on with the stripes going horizontally for a little extra interest and used bright red buttons for a little 'back appeal'.  The crotch closes with snap tape (3 snaps) and there is 1/4 inch elastic in the legs.  I am particularly pleased with the snap tape because I (finally) used a zipper foot when doing the application.  Very neat and tidy.  I'm sorry I forgot to take a photo of that section of the playsuit.

Here is a little closer view of the smocking.  I'm not the best picture smocker but this plate has small stacked figures without color changes so it is relatively easy to do.

I really liked this pattern but it took me longer to construct than I anticipated.  This is due to me being unfamiliar with the pattern and not the pattern itself.  It really is beautifully drafted.  This pattern will get lots of use because this little playsuit was liked by everyone in my house!  Even Logan gave it a 'thumbs up'!  The bodice and waistband are lined but the pants are not so the side seams are serged.  (This fabric would have been a bear to French seam.)  The Buttonhole Fairy was with me and the buttonholes came out great.  My machine doesn't always cooperate when I do buttonholes and they often have to be redone but not this time.  What did give me trouble was the snap tape!  I put it on the wrong sides of the crotch plackets the first time and had to pick out all those tiny stitches.  I don't know what I was thinking!

Anyway, I am so glad I can give this to our neighbors to give to Liam.  I believe they will be going to Miami in a week or two.  Please stop by http://www.projectrunplay.com/2013/01/week-three-boys-week.html to see all the great entrys for this week's challenge.

Sunday, January 20, 2013

Lined Sleeveless Bodice: A Little Tutorial

I recently made a basic bodice dress for a little girl for Week 1 of Project Run and Play's sixth season that included a completely lined bodice that requires no top-stitching. (See here.) I took some photos as I made the dress with the idea of putting a tutorial together for any sewists who might want to try some different techniques.  I had no idea until I started editing the photos and writing descriptions, how hard this is to accomplish!  I am amazed that there are so many women who do this regularly. I applaud you!

I did not take any photos of me cutting out the bodice pieces.  I cut two front bodice pieces on the fold and two back bodice pieces on the fold.  The back bodice pieces will be folded in half to form the two lined back bodice pieces.  My first photo was taken after the front and back bodice pieces (and linings) were sewn together at the shoulder and the neck was sewn right sides together.  When you sew the back bodice pieces to the front and the front lining it will look like a big circle with one side of each bodice back attached to the bodice front at one shoulder and the bodice lining at the other shoulder.  You will then fold the pieces over on each other so that all right sides are  facing each other and the back bodice folds are in the center back like in the photo below.  Happily, I photographed all the next steps and gave details on each photo.  Once you try this technique, I really think you will love it and never line a dress any other way.  You will want to click on the photos to enlarge them to see the writing on each one.
 Oh, I forgot to tell you to get your ironing set up ready and turn the iron on.  It is important to press after each step.  When I learned to sew, a wise woman told me to NEVER sew over a seam without pressing it first.  I press after each step and it makes the finished project so much better.


I hope someone tries lining the bodice this way and lets me know if this helped you.  I will try to get another tutorial together on how to do those nice tucks at the hemline at the same time you put in your hem next week.  I usually do my hems before I attach the skirt to the bodice.  The following week I will show you how I attach the skirt and enclose the seams with the bodice lining (partially at the same time).

Monday, January 14, 2013

Dots and Stripes Tea Party Dress for Project Run and Play Week Two


I am having fun sewing along with Project Run and Play Season Six.  For Week Two the challenge is to sew with dots and stripes.  I knew right away what fabric I would use and for whom I would make this dress.  These three coordinating prints are by Sandy Gervais for Moda and were a gift from a sweet friend:  Carol from MamaCJT at http://mamacjt.blogspot.com/  (I loved using these, Carol. Thank you!)
This is another TQ dress (thank you dress) for a wonderful volunteer whose granddaughter Jannon is in my class this year.  Jannon has the most beautiful light red gold hair and the colors in these prints should look lovely on her.
I used the Petal Knot Dress from the Portabello Pixie pattern "Claire" in a size 5.  It is a loose fitting dress with adjustable straps so it should fit nicely.  I added a white cotton interlining to the bodice to keep the dots from shadowing through to the front and to give the bodice extra strength to support the weight of the skirt with the attached apron.
I really do love to drink my tea every day and usually make at least one pot at home and at least one at school.  Jannon's grandmother often has some of the tea when she is volunteering.  I thought she would appreciate the teapot as a reminder of our time together. (It is not as cute as the "Cow Jumping Over the Moon" pot she gave me earlier in the year, though!)

All the seams are serged or enclosed.  There is nothing to irritate delicate/sensitive skin or to unravel or fray. I hand-stitched the bodice lining down.
I hope you like my Dots and Stripes Tea Party Dress!
By the way, I have been working on editing some of the pictures I took for the first week's challenge and will have a little mini tutorial up later this week on clean finishing the lined bodice of a sleeveless dress.


Monday, January 7, 2013

Birds & Butterflies for Project Run & Play Week 1 Season 6

You can click on the photos to enlarge them to see details.
Project Run & Play Season 6
Sew A-long


  Week #1:  Pattern Remix of The Cottage Home Mama's Party Dress. 

This is not really a remix because I checked out the pattern pieces and realized that I had a basic bodice front and back in the size that I needed already traced that looked almost identical from the front.  It had the overlap I needed for the button and button-hole back bodice I was envisioning.  I just needed to adjust the neckline and sleeve arm openings to go with the scalloped bodice overlay that was in Sew Beautiful Magazine # 141 and pictured on the cover of the magazine.  It is drafted by Kathy Dykstra to be used with the SB pattern "Pascale" but it was an easy adjustment to my generic basic bodice pattern pieces.  I just traced the scalloped overlay in the size 4 that I needed and placed it over my bodice front and back pieces and trimmed away the excess.  I did not use a pattern for the skirt, placket, sash keepers, or sashes because they are just rectangles.  I determined the length I wanted for the skirt and added 8 and 1/2 inches for the seam allowances, hem, and two one inch tucks.  I wanted sashes that would finish 2 and 1/2 inches wide so I cut the pieces 6 inches wide and folded them in half and sewed with 1/2 inch seams.

I am hoping that this dress will fit the recipient of this gift.  (I am guessing on Kate's size!)  This is what I call a TQ Dress.  A 'thank you' gift for the parent volunteer in my kindergarten classroom.  Teachers usually give gifts to their regular volunteers at the end of the year.  I like to make their children something.  I didn't know that I would decide to participate in this sew a-long challenge before we ended the semester so I didn't take any measurements.  I will have this same dilemma for the Week #2 challenge, too.  I based this dress on the size Kate appears to be in relation to other little girl's dresses for whom I did take measurements in years past.  If it works, great!  If not, then I'll get the pleasure of sewing another dress!
I am particularly proud of the details in this dress.  I love the shell buttons (that have been mellowing in my stash for at least 5 years).  The self-faced sashes are heavy so I made sash keepers on both back bodices so that the pretty bow won't droop.  I changed the thread color when doing the tucks in the front contrast panel so that the thread would blend with the fabric.  There are no exposed seams and the bodice is fully lined.

My mother always looked to see how the dresses I made my daughter were finished on the inside.  She did not enjoy sewing and stopped as soon as she could afford to purchase whatever she wanted for us but she had learned enough to look for quality details.  I think my mom would be pleased with this one.
I did not line my bodices like The Cottage Mama did in her dress.  I used two different techniques that I will share with you in another post.  Almost all of the lining was done by machine with just a little handwork in the center front.  The shoulders and armholes were accomplished completely by machine but were not top-stitched.  I call these techniques my 'magic tricks' when I have taught others how to sew.


I did have fun while making this dress!  I hope you like it, too!

Saturday, January 5, 2013

Having More Fun in 2013: Project Run and Play


In reflecting about the year 2012, I discovered that I hadn't made a conscious decision or effort to have fun! One of the things that I really enjoy in my life is sewing because I want to as opposed to I need to make this
There is a wonderful sewing contest/challenge going on over at:
http://projectrunandplay.blogspot.com/    
that has a 'sew a-long' component in a Flicker group.  I seriously thought about doing this last year but my husband's medical issues took precedence and I dropped the ball.  (I actually began the bias challenge but never finished it.)  So..... I am going to join the sew a-long group this time!  It will stretch my computer skills because I have to have my daughter show me how to upload pictures to the group and I have already been playing in the editing section of Photoscape to add arrows and text.  I may even do a tutorial!  I am continually growing and learning!

I have the six weeks mostly planned out and have begun several of the projects and completed the first challenge that I will post on Monday.

Week #1:  A basic bodice dress using these two fabrics.  Completed!

Week #2:  Dots & Stripes using these fabrics gifted to me by the lovely Mama CJT (Carol) at http://mamacjt.blogspot.com/ .  This outfit is already cut out and ready to be sewn up.

 Week #3:  Boy's Week.  When I took this picture I was undecided about two different fabrics and smocking plates but I have committed to the sailboats because it is an easier/faster plate.  I am a SLOW picture smocker.  I have been busy and the smocking only needs some finishing touches.  Then I can work on the construction.

Week #4 Valentines:  This one has been cut out but I may not use the red hearts fabric.  There isn't enough contrast.

Week #5 (My favorite!) Men's Shirt:  This is one of the two that I am most excited about and I have done quite a bit on this already just because I LOVE making baby clothes!  This will be something for a newborn.  The shirt is a pale sage green 100% cotton XL I found at the Hospice Resale Shop last week for half the tag price of $6.99.  The buttons are beautiful and I'll save them but I want to use shell buttons on this baby outfit.  I am also using some trim that Carol gave me for this one.
 Week #6:  Signature Look:  This one is easy for me to decide.  I love heirloom, handwork, lace, and pretty fabrics.  At the same Hospice Shop I found several of these unused 100% cotton lawn curtains and I am using the valance as an overlay on a little dress.  This, too, has had quite a bit of work done on it because preparing the battenburg overlay required removing the stitching in the top casings a stitch at a time to avoid damaging the delicate fabric.  (See pictures below.)


All in all, I am pretty excited about this sewing challenge and I have definitely had fun!  School starts again on Monday so I will have to see if I can muster up the energy to sew some each night after spending the days with my kindergarten class.  It sure has helped to be off these two weeks to begin the process and I think that I have gotten lots accomplished.

Are you making a conscious decision to have some fun?  I believe that the Almighty wants us to enjoy ourselves while here, don't you?  He gave us this wonderful planet with all its glory and people and other creatures to share it with us.  We are so blessed!
Related Posts with Thumbnails